Welcome to your December 2022 Dream Wardrobe.
UK SIZES 6-30
We have certainly seen some colder weather this week, and this month’s Dream Wardrobe is perfect for keeping you cosy in these chilly temperatures.
I’m sure you will all enjoy snuggling up in this cosy sherpa pull over.


About the fabric:
This cream and black animal sherpa was made especially for us in France. It is the perfect fabric for the Didi Pullover from Fibre Mood.
We have included enough of the fabric for the Didi pattern, but you could also try these patterns:

Merchant & Mills The Sidney Sweatshirt

True Bias Marlo Sweater
I always recommend that you pre-wash your fabric. For this Sherpa fabric, we washed it on a delicate cycle at 30 degrees with a little bit of fabric conditioner and it came out beautifully fluffy.
How to use up your scraps…
Sherpa makes great cushions, bags or hot water bottle covers. It would also make the best mittens, I made a pair last winter in sherpa that I lined with a lightweight jersey, they really kept my hands toasty! Or how about a simple head band to wear over your ears.
About the pattern:
The Didi pullover from Fibre Mood. Find the instructions here (you will need to create an account with fibre Mood)
This zip neck pullover has a retro feel about it but being made in the sherpa fabric brings it bang up to date. The pattern can be made with or without sleeves. Bear in mind that if you choose to make the version with sleeves and want to use the sherpa for the cuffs and waist band, I suggest adding extra width to the bands, otherwise they may be a bit tight.
I also sized up for mine to give a more oversized relaxed fit.
Notions required:
- Matching thread (we have sent you a reel of the Gutermann rPET thread made entirely from recycled plastic bottles)
- 35cm (14”) zip
The Sherpa is the ideal match for this pattern, you could also use this pattern and make a version in one of the following fabrics
Super Thick Sweatshirt Fleece - Emerald
Knitted Waffle Cotton Jersey - Khaki
About your gift:
I use washi tape so much while I am sewing and this one is printed in our very own Joni design.
Washi tape is easy to tear and the non-permanent adhesive means you can stick it down and move it around without damaging it, or your walls!
A few ideas to use your washi tape:
- Sticking sewing patterns together
- Extending the line of your seam allowance on your sewing machine
- Sticking your needle to your machine when you swap it out for your topstitching or twin needle so you can find it
- Sticking inspiration images to your walls
... the possibilities are endless!
#fgdreamwardrobe
Want to share your Dream Wardrobe? Use the hashtag #fgdreamwardrobe and share your unboxing and final makes on social media.
Happy sewing, Josie xxx
The Didi Pullover- Sewing Notes
Prewash fabric
I prewashed the fabric on a ‘delicates’ setting and found little to no shrinkage.
Before prewashing I overlocked (serged) the raw edges of the fabric and gave it a good shake to remove the excess fluff before putting it in my washing machine.
If you choose to do this, overlock the fabric with the wrong side facing you, this way you can make sure that you catch the raw edge.
Ironing
I did a few tests and this fabric will take a low / medium heat iron.
I didn’t iron the fabric at all before or during construction as I found that it wasn’t necessary.
Cutting Out
Look at the body measurements and ‘Finished garment measurements’ to help you choose the right size. As the sherpa fabric is very bulky it’s best to pick a size at least 1, if not 2 sizes bigger than the pattern suggests.
For the wrist trim (cuffs) and hem bands on the front and back, I cut these wider than the pattern pieces. This makes it easier to attach the cuffs as they are not as small and gives the lower edge a little more width.
I made the lower band 10cm (4”) wider than the pattern measurements. This is 10cm (4”) narrower than the measurement of the lower edge of the front / back.
I made the wrist trim (cuffs) 6cm (2 ½”) wider than the pattern measurement. This is 5cm (2”) narrower than the end of the sleeve.
When cutting out the fabric, fold the fabric right sides together so you cut from the wrong side. It’s much easier to see where you are going without the fluff of the fabric getting in the way too much.
Long pins with large heads are perfect for pinning out the pattern and cutting out this fabric as it is so dense.
I ignored the cutting layout and tried to be more economical with the fabric so I can use the left overs for some scrap busting winter projects.
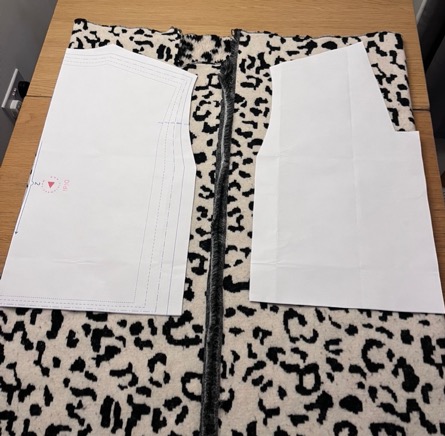
I started by folding the raw edges over to the centre of the fabric to create two folds and then cut out the front and back pieces:

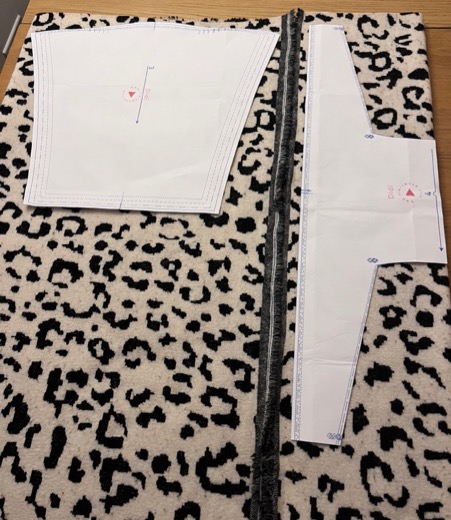
I then refolded the fabric to create 2 new folds so I could fit both the sleeve and the collar piece onto the fabric:

After cutting out these pieces I used the remaining fabric to cut the hem bands and wrist trims, using as little fabric as I could.
Transferring pattern markings
Make sure to transfer all the notches and the small square markings for the front and collar. I use a tiny snip in the centre of the notch marking and a tailor’s tack for the small square markings.
Making up the garment
I used a size 80/12 universal needle as the fabric is medium weight. Although the fabric is knitted I didn’t need to use a jersey / ballpoint needle.
The seam allowance on the pattern is 1cm.
When constructing I found that the overlocker (serger) didn’t like working through more than 2 layers of fabric and it wasn’t too happy with the 2 layers. I did force the fabric through the machine but it was a bit of a struggle in places.
To avoid this, you may wish to edge finish all your pattern pieces first, before stitching the pieces together.
If you are overlocking the pattern pieces you will probably need to adjust the differential feed settings to avoid the fabric from stretching out of shape, resulting in a very fluted and wavy edge. Turn the differential feed (DF) up to a higher number. I used a setting of 2 DF and a stitch length of 3.75. I used a 4 thread stitch to give additional strength and width.
Julia’s tips for working with bulky sherpa fabric:
- Use long pins to pin out the pattern and cut out the fabric
- Edge finish fabric before constructing.
- Use seam clips to hold the layers of fabric together during construction.
- When you’re sewing, squash the fabric flatter to help it under the presser foot.
- Use a slightly longer stitch length (3 to 3.5mm)
- Use a walking foot to help the fabric move through the machine.
- When pressing, use a little steam, a short press and a wooden clapper.
- From the right side of the fabric, use a comb to tease the fabric fibres out of the seams to avoid them being trapped and giving a flat look at the seamlines.
Steps 1:
For the shoulder seams I used a long machine stitch (4mm) to tack (baste) the pieces together and then overlocked the seam, replacing the tacking stitches with the overlocker stitches. I finger pressed the seams to the front and didn’t use the iron.
Step 2:
Before edge finishing the raw edges of the collar piece I applied a narrow (1.5cm / 5/8”) strip of interfacing to the raw edge and then overlocked this in place. The fabric is rather stretchy and the interfacing will help to stabilise this edge for the zip. You can use fusible seam tape instead of interfacing strips.
I applied the zip as suggested and tacked this in place before folding the collar in half to sandwich the zip in place. I then pinned the remaining edges in place and then stitched in the zip.
Step 3:
I matched the collar to the front and stitched this in place without needing to snip into the seam allowance. After stitching I overlocked the raw edges of the fabric.
Steps 4 and 5:
I constructed these like the shoulder seams, I used a long machine stitch (4mm) to tack (baste) the pieces together and then overlocked the seam, replacing the tacking stitches with the overlocker stitches.
Step 6:
I stitched the short seam of the wrist trim on the sewing machine without overlocking so I could press this open and reduce bulk.
Have the sleeve right side out and put the cuff over the edge. Match the seam and stretch the cuff to fit.
Stitch from inside the tube so you are sewing with the wrong side of the fabric facing you.
Once I’d sewn the wrist trim in place, I overlocked the edges but my machine wasn’t too happy with the 3 layers of fabric.
Step 7:
I used a similar process to that used in step 6.
Once the construction was finished I gave the garment a good shake to remove all the excess fluff.
I’m hoping to make some mittens and a headband with the left over fabric J
Tutorials and videos on techniques can be found at www.houseofmisssew.com or https://www.youtube.com/c/HouseofMissSew/videos


