Welcome to your February 2024 Dream Wardrobe.

UK SIZES 6-18
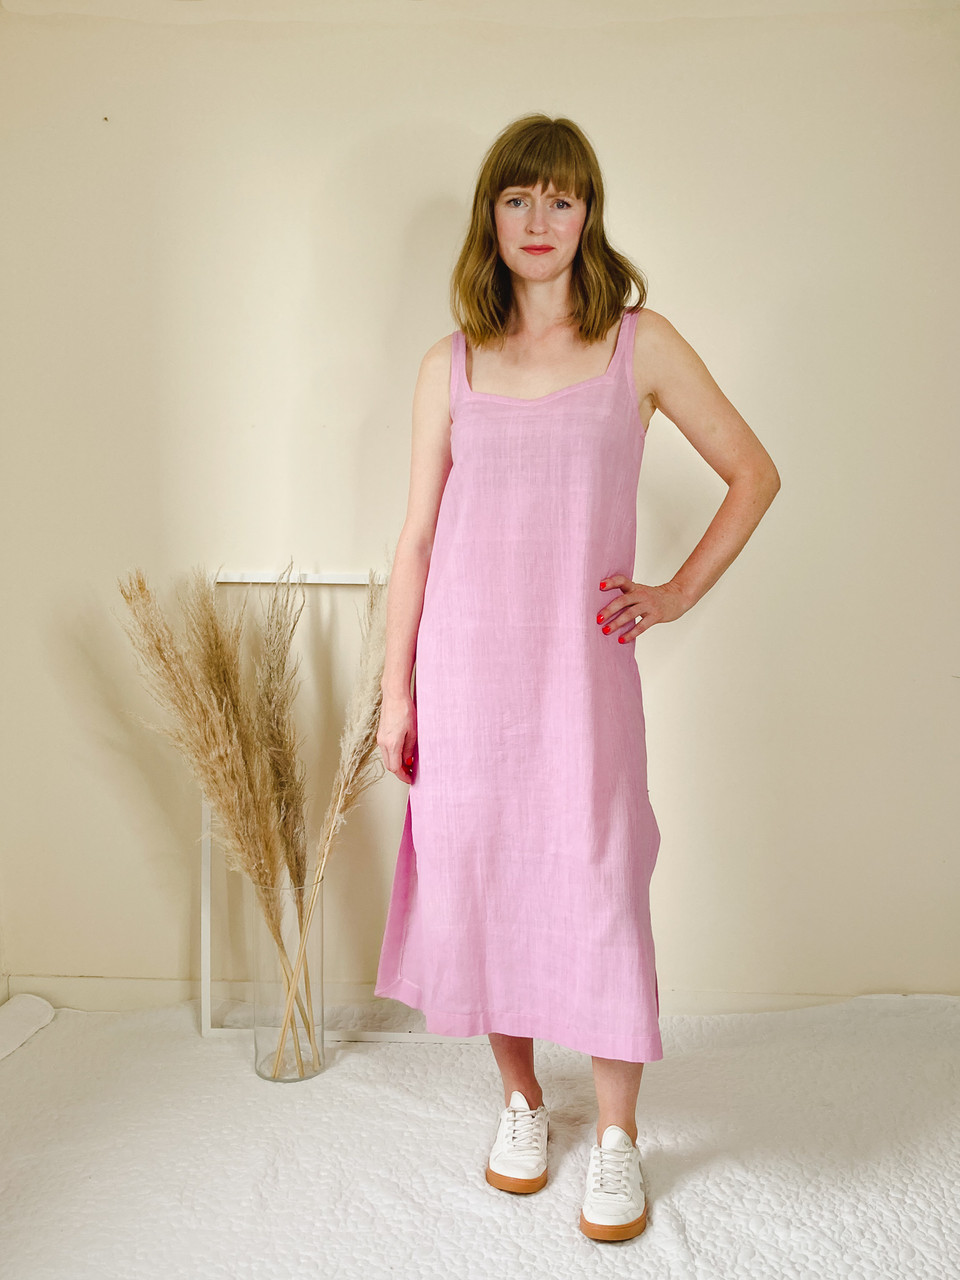
We are seeing denim everywhere at the moment, from fashion week to the high-street and on the cover of every magazine. It’s the time of year when spring is just around the corner, but there’s still a bit of a chill in the air. So, I thought that the perfect addition to any wardrobe would be the Sew Me Something Florence Dress.
About the fabric:
This denim is the perfect lightweight fabric for dresses and shirts. At 4oz, it is one of the lighter weight denims we sell. It has a lovely soft feel as it has been washed and treated to gain that drape that works so well in a dress like this.
As always, I recommend pre-washing your fabric to remove any dressing and allow for pre-shrinking. A cool wash will be fine, just make sure the temperature you use to prewash is the temperature you plan to wash the final garment at. You don’t want your final garment to shrink.
This fabric would also work well for:

Emporia Florence dress

Atelier Scämmit Diapason Blouse
Homer + Howells Innes Midi Dress
About the pattern:
The Florence Dress is a relaxed fit, easy to wear, midi-length dress perfect for Autumn and Spring. Can be worn day to night, the ultimate transitional garment for your wardrobe. It comes in two versions, Version 1: A bound placket with flat collar, three quarter length darted sleeves and gathered skirt with cut away pockets.
Version 2: Around neck with bias binding finish and keyhole back neck opening with long gathered sleeves and a gathered skirt with cut away pockets.
I made version 1 with the button placket and added the longer sleeve from version 2. I also lengthened the skirt and sleeves.
Notions required:
Version 1
- Matching Thread
- 4 x buttons
- Interfacing
Version 2
- Matching thread
- 1x button
- ready-made bias binding (if not making your own)
- 1/4" elastic
The Florence Dress would also look great in:

Linnaea Cotton Lawn - Multi

Angela Cotton Lawn - Emerald

Iris Viscose & Linen - Green & Lilac

Ottoline Gingham Viscose & Linen - Green
|
|
About your gift:

With Spring almost here it’s time for Spring cleaning, and why should your iron miss out. That’s why I have included a Prym Iron Cleaner stick. The iron cleaner and descaler is a special cleaning pen for the care of the sole plate of every iron. It cleans and descales all easy-glide sole plates and increases the irons capacity to glide smoothly.
#fgdreamwardrobe
Want to share your Dream Wardrobe? Use the hashtag #fgdreamwardrobe and share your unboxing and final makes on social media.
Happy sewing, Josie xxx
Julia's Sewing Notes
Compare your measurements to the body measurements and finished garment measurements on the pattern. The garment is quite loose fitting so you may choose to make a size smaller than the pattern suggests, depending on your fit preference.
I made version 1 with the button placket and added the longer sleeve from version 2. I cut a size 12 and lengthened the skirt by 12cm and the sleeve by 3cm. The waist seam is rather low and so I shortened the bodice by 2cm. This was a little unusual as I would normally lengthen most bodices by 1 to 2cm.
Prewash fabric
There was approximately 5% shrinkage after prewashing. To avoid the white streaks that you can often get when washing denim, try the following:
- Make sure your denim is unfolded completely before putting it in the washing machine.
- Use a tennis ball or dryer ball in your machine to ensure the denim keeps moving while being washed.
- Use a dye catcher sheet (available from most supermarkets) to catch any loose dye.
- Add table salt in the washing machine to help fix the dye.
- Make sure you remove the denim from the washing machine as soon as the wash has finished.
- Dry flat and shake out any creases in the denim while still damp.
It is advisable to repeat these washing instructions for the first few washes.
Ironing
This fabric irons beautifully and easily. I used almost the maximum heat setting on my iron and a little steam.
Cutting Out
The skirt pieces I and J will need to be lengthened. The pattern instructions say to lengthen by 51cm but I added 63cm to give a longer length. I drew the shape out in chalk onto the wrong side of the fabric. When shortening the bodice, I folded the back bodice on the lengthening and shortening lines, taking out 2cm.

On the front bodice I didn’t want to alter the length of the placket, so I shortened the bodice below the lengthening and shortening lines as shown in the photo.

Transferring pattern markings
Make sure to transfer all the notches and small circles, particularly those on the sleeves and around the placket opening. I use a tiny snip (5mm / ¼ inch) to transfer to notch markings and use tailor’s tacks for the small circles and tip of dart.
Interfacing
Apply lightweight fusible interfacing to the areas indicated in the instructions. There are pattern pieces for all the pieces that need interfacing except for the piece at the bottom of the placket. I cut a 4cm square and applied this to the wrong side of the front bodice at the bottom of the placket.
Making up the garment
I used a size 80/12 universal needle as the fabric is lightweight.
The seam allowance on the pattern is 15mm (5/8”) except for the neckline when a 10mm (3/8”) seam allowance is used.
Step 1
The first step if you’re making Version 1 is to mark the placket opening on the front. The pattern suggests stay stitching the rectangular opening, but I found that some of the stay stitching was visible after construction and when removing the stitches, it’s easy to damage the fabric. I’d suggest not stay stitching the placket opening but do make sure you use the square of interfacing at the bottom of the placket opening.
Stay stitch the neckline at 8mm from the raw edge so that your stitching is closer to the seamline.
Step 2
To transfer the markings and sew the darts, see my video on ‘3 Ways to Sew a Single Point Dart’
Step 3
After sewing the centre back seam I edge finished the seam with a 3-thread narrow overlocking (serging) stitch. This is my preferred method for overlocking woven fabrics which don’t easily fray. Simply remove and unthread the left needle of your overlocker (serger) to create a narrower stitch.
Steps 4 to 11
Creating the Placket opening.
This is the most difficult part of the construction.
I worked this a little differently and applied the right side of each placket to the wrong side of the garment before folding these over to the right side of the garment and stitching in place.
Creating the placket takes precise marking and stitching so take your time to make sure that you’ve transferred the markings correctly and sew in exactly the right place. Clip into the fabric carefully too, you need to clip far enough to make sure the garment sits flat but not too far or you’ll create a hole.
For a sew along on how I created the front placket, see my video ‘How to Sew a Front Placket’
Steps 14 – 20
Attaching the collar
I edge finished the lower edge of the inner neckband with a narrow 3-thread overlock stitch.
There is a 1cm seam allowance on the neck edge and collar.
I also understitched the collar as far as possible after step 18 to keep the inner collar to the inside.
Steps 21-22
Making buttonholes and attaching buttons.
It’s really important to place the button 3mm below the top of the buttonhole for the correct alignment. If you place the button in the centre of the buttonhole, the placket will slip down until the top of the buttonhole touched the button and will be misaligned.
For more details on this, see my video ‘Sewing on Buttons’
Steps 23 – onwards
Sewing in Sleeves
I used the long sleeves with elasticated cuff from Version 2 for the sample dress I made for Josie
Make sure to mark the notches on the sleeves and the armholes, and also the small circles on the sleeve to indicate where to add the ease stitching.
For more details on how I did this, see my video ‘How to insert a Sleeve’
For more details on adding an elasticated cuff, see my video ‘How to create an elasticated Cuff’
Steps 51 – 54
Attaching the pockets
See my video on ‘Creating a hip / Jeans pocket’ for more guidance on this technique.
Steps 55 – 57
Sewing the skirt together and gathering
Place a small snip in the centre front at the top of the skirt front and back and at the bottom of the bodice in the centre of the front and back. This will give you a reference point for distributing the gathering in the skirt.
I sewed the side seams of the skirt first, edge finished these with a 3-thread narrow overlock stitch and then added the gathering stitches to the top of the skirt breaking the stitching at the side seams.
Steps 58 – 59
Attaching the skirt
Pull up the gathering to fit the skirt to the bodice.
For more details on this technique, see my video on ‘How to Sew Gathers’
Step 60
Hemming
I turned up the hem by 4cm, pressed to make a crease and then turned the raw edge into the crease, pinned and topstitched in place.
This technique is demonstrated in my ‘Turned Twice and Machined Hem’ video.
More tutorials and videos on techniques can be found at www.houseofmisssew.com or https://www.youtube.com/c/HouseofMissSew/videos