Welcome to your January 2024 Dream Wardrobe.

UK SIZES 6-18
January is the perfect time to start making those transitional pieces that can work for many seasons. Something you can wear now but will also carry you through to Spring and beyond. So, these chic wide-leg trousers are the perfect wardrobe staple.
About the fabric:
At Fabric Godmother we are known for our deadstock Fabric. Our deadstock dressmaking fabrics are all fabrics saved from landfill or destruction. Making them a great choice for customers who want to reduce their impact on the planet or just grab something unique. Due to Deadstock fabric's limited nature, many fabrics in this month’s box are slightly different, but all on a navy check theme.
This month's fabric is 100% fine wool, suiting designer deadstock from a UK designer famous for his suits. This wool suiting is comprised of extra fine wool fibres in a compact weave to give a smooth finish. It is lightweight and cool to touch.
I always recommend pre-washing your fabric. With wool suiting, I suggest a cool wash or wool cycle if your machine has one (the cooler, the better for the environment; I wash pretty much everything on 20). I would also suggest a slow spin cycle for wool, as the fibres do not like to be agitated too much. Wool suiting like this is warm but breathable and has a beautiful drape, perfect for timeless winter/spring outfits.
We have given you 2.6m of fabric this month, so there is plenty for the pattern included, or you could try one of these ideas:

Papercut Patterns Lulee Dress & Skirt

Vikisews Edna Trousers

Vikisews Carla Trousers
About the pattern:
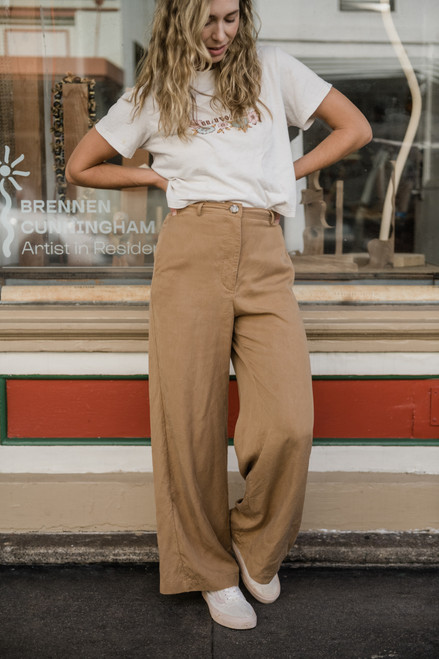
The Protea Pant is a modern trouser with chic front pleats, sweeping pant legs, and a curved waistband. Designed for a range of different fabric weights and styles, this will be a staple pattern in your wardrobe.
View A has pleats in front, View B has a flat front. I’ve made view B with—the flat front.
DOWNLOAD THE INSTRUCTIONS HERE
Notions required:
- Matching thread (we have sent you a reel of Gutermann rPET thread)
- a zipper (size will varying depending on garment size, details can be found in the instructions)
- 3/4 inch button
- Lightweight woven interfacing
- Bias binding (Amounts can be found in instructions)
- Lining fabric (We suggest Leona Stretch Pinstripe Lining - Black & Gold or Liza Acetate Mix Lining – Indigo)
The Protea Pants would also look great in:

Ripley Wide Stripe Denim - Indigo

Sanded Lenzing Tencel & Linen - Mauve
About your gift:
We thought it would be nice to celebrate your new year of sewing with these 2024 labels! Made especially for Fabric Godmother and exclusive to the Dream Wardrobe. You can put these in your dream Wardrobe project or anything you decide to make in 2024.
#fgdreamwardrobe
Want to share your Dream Wardrobe? Use the hashtag #fgdreamwardrobe and share your unboxing and final makes on social media.
Happy sewing, Josie xxx
Julia's Sewing Notes
There are two views to choose from: View A with the pleated front or View B with a flat front. I made View B for Josie with the clean finish details instead of any topstitching.
Compare your measurements to the body measurements and finished garment measurements on the pattern. The pattern gives measurements for the front rise and back rise, which is the measurement along the seamline of the crotch curves. Compare this to your own measurements and allow approximately 2.5cm for wearing ease and more for design ease as desired. (If you want the crotch to sit a little lower)
Prewash fabric
There will be some shrinkage when prewashing this fabric so make sure you don’t skip this stage. I found approximately 5% shrinkage in the weft but 0% in the warp.
Ironing
Iron the fabric while it is still a little damp to make it easier to remove the creases. I used a medium heat setting and a water spray to remove the creases.
Cutting Out
I cut a size 12 at the waist and tapered this to a size 16 at the hips. I needed to alter both the front and the back rise, so I cut across the front and back leg patterns along the lengthening and shortening lines. There is some guidance for doing this on page 7 of the instructions. This illustrates how to add an even amount across the leg and pocket sections.
In the front, I added 1.5cm to the side seam but took 1cm out of the font crotch, creating a slight wedge across the pattern, as shown in the photo below.

I then folded out the pleat to remove this fullness from the front leg.

In the back, I lengthened the crotch by 3cm and then tapered it to 1.5cm at the side seam to match the front leg at the side seam.

The crotch and side seams were then trued to ensure the lines met up correctly. If you’ve changed the shape of the side seam or blended between sizes, you will need to repeat this for the pocket so that the side seam will align correctly. If you’re using a checked fabric you may wish to pattern match the pieces and ensure the patten will align across the front and back legs. I used a black lining fabric for the inner waistband and the pocket lining. You’ll need to cut 4 of the pocket lining pieces to create the pocket bags.
Transferring pattern markings
Transfer the notch markings for the back darts, side pocket placement and the circle marking on the front leg for the end of the zip. Mark also the stitching line on the pocket bag as indicated on page 11.
Making up the garment
I used a size 80/12 universal needle. The seam allowance on the pattern is 10mm / 1cm (3/8”). Follow the guidance on page 12 for applying the interfacing where the pockets will be positioned, along the left front zip extension, the fly facing and the waistband.
I used a medium/lightweight iron on woven interfacing. I interfaced both the outer and inner waistband pieces to give the waistband a little more structure. As my lining fabric was a little slippery, I applied the interfacing to the lining before cutting out the waistband piece to ensure the shape was not distorted.
Check the size chart for the zip length; this will vary depending on your size and any adjustments made to the front crotch length. You can always buy a longer zip and shorten it by hand-stitching across the zip tape to create a new zip stop. Any excess zip tape can be cut off from 1cm below your new zip stop.
For tips on transferring markings and sewing the darts, see my video here:
3 Ways to Sew a Single Point Dart
Follow the pocket instructions carefully. Figs 1-3 show the pocket facing (cut from the main fabric) applied to a single layer of pocket lining. Figs 4-7 show how to create the pocket bags by attaching the 2nd pocket lining piece and creating a French seam. I used a 3-thread narrow stitch on my overlocker (serger) to edge finish the seams except for the pocket bags where a French seam is used. I used the topstitch finish on the belt loops to make them sit flatter.
I used the satin bias binding to edge finish the lower edge of the inner waistband. I never get the finish I like by wrapping the binding over a raw edge and stitching it into place in one step, so I apply the binding in two steps. First, open out one of the folded edges of the binding and match this to the wrong side of the waistband with the raw edges aligned. Stitch this in place. Press the binding away from the waistband then wrap the binding over the raw edge and topstitch this in place from the right side. I finished the front of the waistband with a black hook and bar.
More tutorials and videos on techniques can be found at www.houseofmisssew.com or https://www.youtube.com/c/HouseofMissSew/videos