BREAST CANCER NOW'S WEAR IT PINK DAY
On the 21st October, we will wear it pink, raise money and help make life-changing breast cancer research and support happen.
Why? Because every pound raised could help fund a potentially life-saving research breakthrough.
This month, as part of your Dream Wardrobe, Fabric Godmother has donated to Breast Cancer Now.
Welcome to your September- 2022 Dream Wardrobe.
UK SIZES 16-30
This month we are encouraging you to Wear it pink on the 21st October. We’ve included some of our beautiful Pinkie viscose crepe so you can make your own pink garment.
About the fabric:
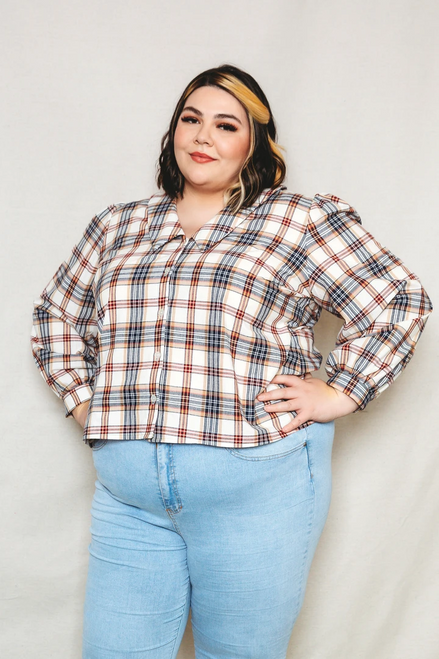
Pinkie is a vintage design we have digitised and printed as part of the Fabric Godmother collection. I love the large flowers and think that the colour adds a welcome drop of brightness going into Autumn. I plan to wear mine with a burgundy jumper as the weather cools to pick out the darker shades in the flowers.
We have included 3m of the fabric, enough for the included Mave skirt pattern but also you could try these patterns:
Friday Pattern Company Patina Blouse (Intermediate)

Friday Pattern Company Saguaro Set (Beginner)

Chalk & Notch Evelyn Skirt PDF (Intermediate)

The Assembly Line Cuff Top SIZES XL-4XL (Beginner)
I always recommend that you pre-wash your fabric. This is especially important with fabrics that are made from natural fibres (cotton, linen, viscose etc) as these have more of a tendency to shrink.
About the pattern:
The Mave skirt is a versatile tiered skirt pattern. I would wear this style all year round with a tee shirt in the summer and choose big boots and a chunky jumper in the winter.
Notions required:
- Matching thread (we have sent you a reel of the Gutermann rPET thread made entirely from recycled plastic bottles)
- 2” wide elastic
- Scraps of interfacing
The Mave looks fabulous in the Pinkie fabric but also would work really well in the following fabrics:
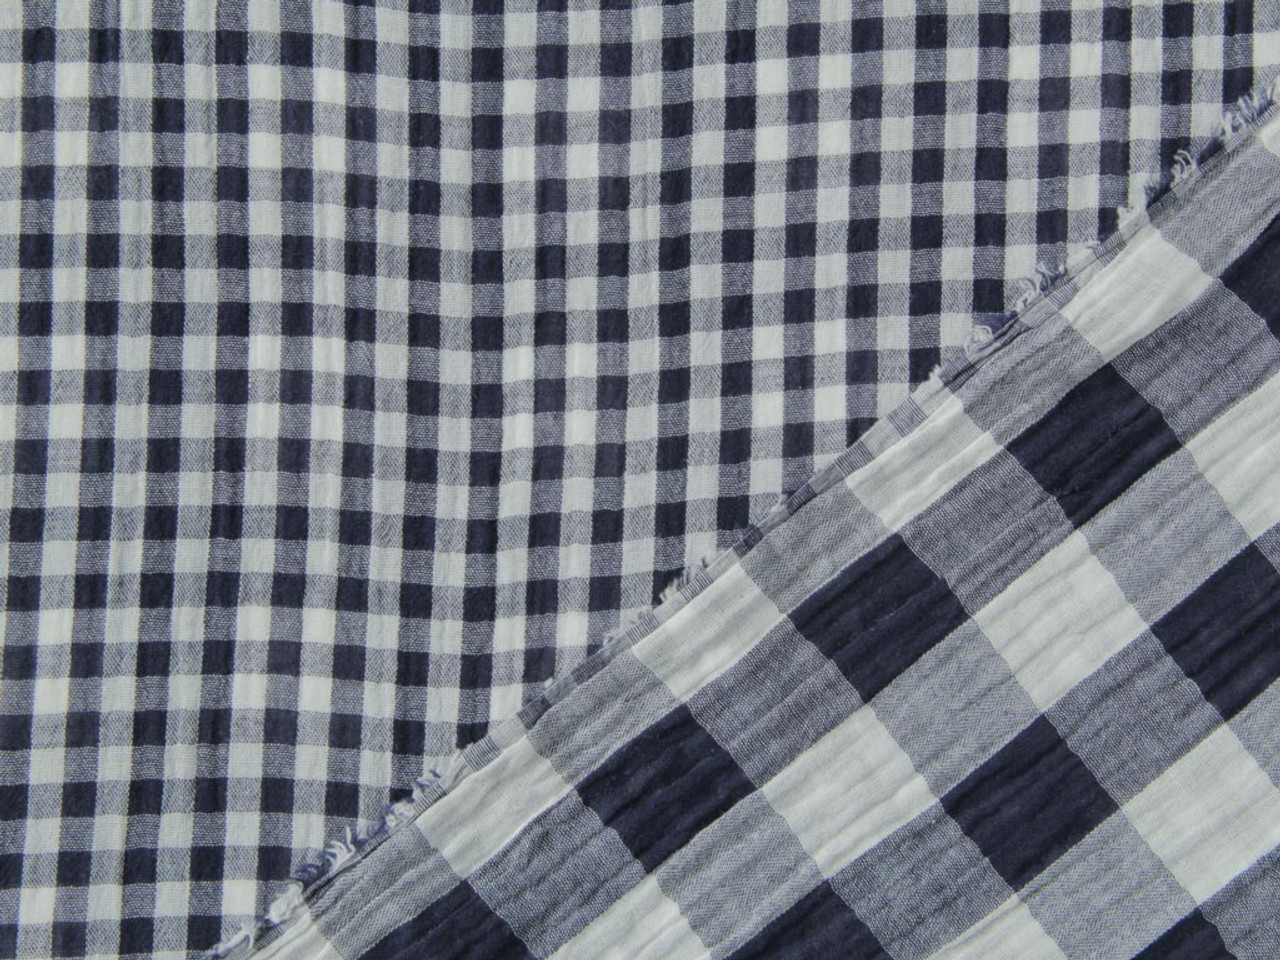
Double Sided Gingham Double Gauze Cotton - Navy

Shimmy Foil Dots Viscose Lawn Navy

Metallic Ditsy Flowers - Green
About your gift:
This month we have donated to Breast Cancer Now on your behalf.
We have also included a bright pink pencil. I always have a bright pencil in my sewing room, they are great for making notes on patterns and the bright colour means I can always find it no matter where I have left it!
#fgdreamwardrobe
Want to share your Dream Wardrobe? Use the hashtag #fgdreamwardrobe and share your unboxing and final makes on social media.
Happy sewing, Josie xxx
The Mave Skirt - Tips from Naomi
Prewash fabric
I found a tiny bit of shrinkage after washing a 10cm swatch at 30°C.
Ironing
I used almost the maximum heat setting on my iron and a little steam.
Choosing a View
The Mave skirt has numerous versions to choose from with different lengths and a number of tiers. I made the Maxi version with 2 ruffles. The handy chart at the front of the booklet shows you which pieces you will need and where to cut them. There is also an option to line the skirt which didn’t feel necessary with this fabric.
Cutting Out
Viscose crepe can be a shifty fabric to cut so, once I had given it a good press, I spent quite a bit of time ensuring it was straight before cutting. I find it helpful to cut as a single layer. I use the edge of my table to line up the selvedge and use some tape on the edge of the table to keep it straight. I am very careful not to stretch the fabric when taping. I also wanted to ensure the placement of flowers was central in each tier so cutting as one layer made this easier.
Alterations to the pattern
I graded from a size 10 in the waist, out to a 14. When I graded, I avoided grading through the pocket placement. It may not be necessary to grade out fully to your hip size as the pattern has a lot of fullness in the tiers. The finished length was 94cm on the chart but I decided to shorten later. I actually found that the finished length for the Maxi skirt was about 89cm, not 94cm. I would suggest measuring the pattern pieces, taking off the seam allowance and combining the lengths to check your finished length and then adjust accordingly. Remember to fold the waistband in half lengthways before measuring.
Transferring pattern markings
I transferred all notches and marked the stitching line for the waistband topstitching. I used a Frixion pen. This disappears once pressed but they can be known to re-appear in colder conditions so you may want to pre-test this if it’s a concern. These marks were useful as an initial guide but I essentially used my foot and machine markings as a guide so you could just mark the starting point for each line of stitching.
Making up the garment
I used a microtex needle to prevent holes in the fabric.
The seam allowance on the pattern is half an inch. I work in centimetres so I marked 12-13mm with wash tape on my machine as a guide.
I edge finished all the seams with a 3-thread narrow overlocking (serging) stitch. This is my preferred method for overlocking woven fabrics which don’t easily fray. Simply remove and unthread the left needle of your overlocker (serger) to create a narrower stitch.
Sewing tips
When taking out the basting stitches, unpick gently and don’t pull too hard on the thread too hard as it can leave holes in the fabric. Pull the bobbin thread, rather than the top thread. Any needle holes should close up with a little pressing.
When sewing the drawstring in half, turn off the steam setting on your iron to decrease the risk of burning your fingers.
When inserting the elastic and the drawstring, attach a safety pin to the end. Especially in the case of a narrow channel, like the drawstring, there is a risk of the pin getting stuck and opening. I wrap the closed end in wash tape to prevent it opening on the way through.

To sew even topstitching on the waistband I drew lines on either side of the buttonhole openings. Once I had lined up the needle with these lines, I marked where the edge of the waistband came to on the needle plate with tape. This is the line I followed to ensure straight top stitching all the way around. I then marked lines the same distance from these at the top and the bottom. It is important to keep the first two lines to the outside of the button hole to allow enough space for the drawstring to pass through.

When stretching the waistband elastic to sew, make sure to stretch evenly all the way around to avoid uneven stitches.
The pattern suggests knotting the drawstring or adding beads. Once I had pressed the folds in place, I folded the end inside neatly so It had a sewn end.

The pocket bag hangs and can cause bulk in the hip area so I laid the pocket bag flat against the inside front of the skirt. I hand stitched the seam allowance to a tier seam, where they met. This holds the pocket bag flatter.
