Welcome to your October 2023 Dream Wardrobe.
UK SIZES 6-30
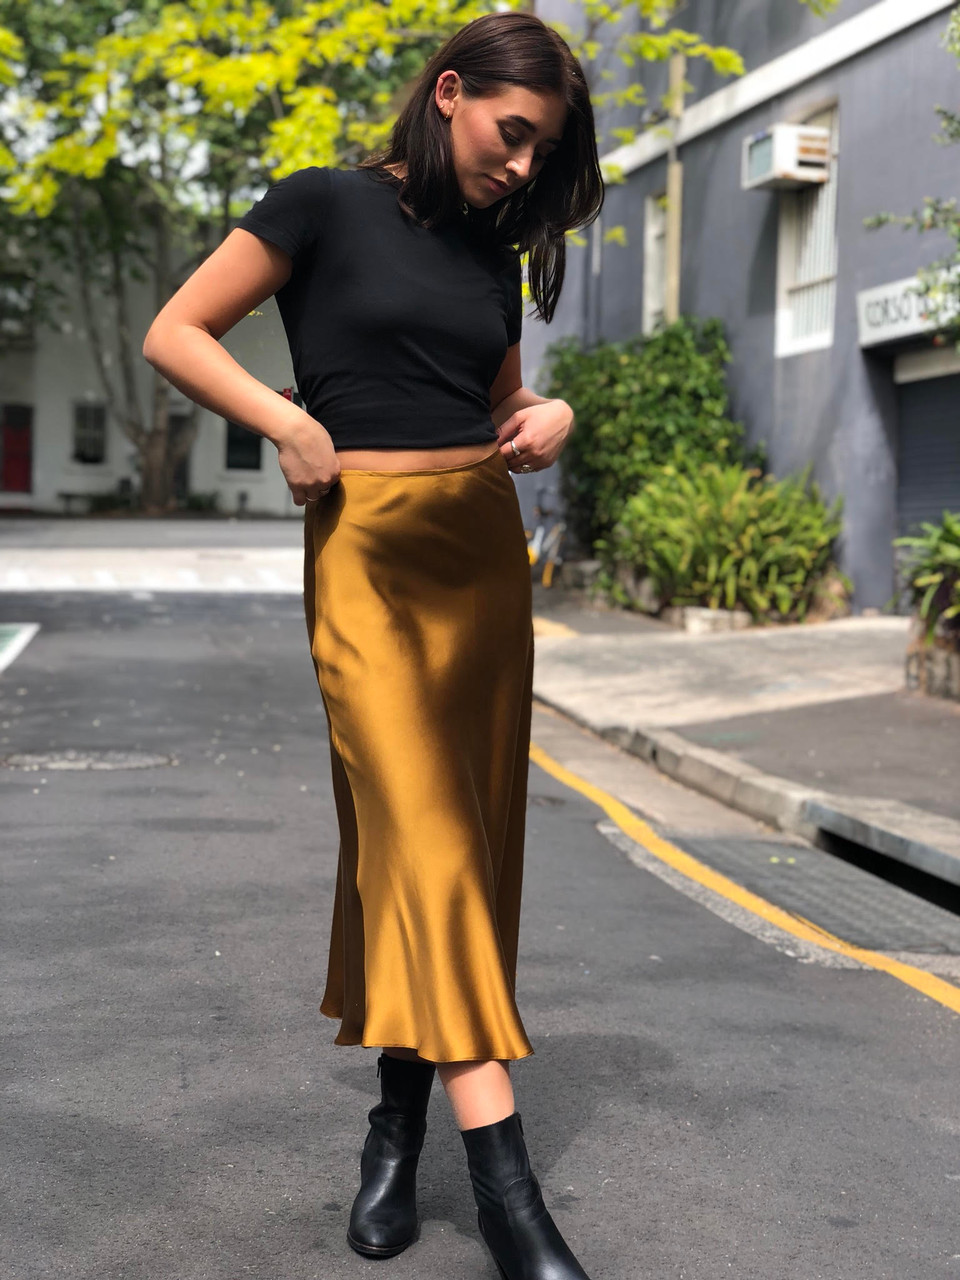
I know it is a little early to be mentioning the ‘C’ word but this felt like the right time to start thinking about sewing party wear. So this month we have paired one of our own Fabric Godmother Collection prints with the perfect party dress.
About the fabric:
The Estelle viscose Ecovero satin is just stunning. It was originally a 1970’s print that we worked with the Print Pattern Archive to digitise and re colour. Featuring magenta and emerald green on a midnight background. The baubles, sprinkled with stars and cascading ribbons give a stunning movement to this print.
Ecovero is a traceable viscose from a managed forest in Austria. As it is made from natural material (beech trees) is it breathable and not static.
I always recommend pre-washing your fabric. With viscose I suggest a cool wash (the cooler the better for the environment I wash pretty much everything on 20). I would also suggest a slow spin cycle for viscose as the fibres do not like to be agitated too much.
With viscose I recommend using a Microtex needle. And make sure your pins and scissors are sharp.

We have given you 3.5m of fabric this month so there is plenty for the pattern included or you could try one of these ideas.

About the pattern:
The Fibre Mood Holly dress is a simple shape that really shows off the fabric it is made in. We made a long version but I also think this fabric would be brilliant in a mini version.

Notions required:
- Matching thread (we have sent you a reel of Gutermann rPET thread)
- Interfacing (I love this cotton one)
- Buttons (We used these self covering ones)
- Invisible zip
The Holly dress would also be great in the following fabrics:


About your gift:
This month we have designed a bespoke label to match your party fabric. I love adding a label to my handmade clothes for an extra special touch.
#fgdreamwardrobe
Want to share your Dream Wardrobe? Use the hashtag #fgdreamwardrobe and share your unboxing and final makes on social media.
Happy sewing, Josie xxx
Julia's Sewing Notes
The pattern instructions can be accessed for free on the Fibre Mood website. You will need to create a free account and be logged in to access the instructions from the Holly Dress pattern information page.
The information about pattern pieces and the cutting layout can be found at the end of the instructions, on pages 15 and 16.
Prewash fabric
I found approximately 3 to 5% shrinkage after washing at 30°C.
Ironing
This fabric irons beautifully and easily. I used almost the maximum heat setting on my iron and a little steam.
Cutting Out
I chose the size 42 at the bust, graded to a size 44 at the hips. If you are between sizes, you could probably get away with going for the smaller of the two sizes.
I added 15cm (inches) to the length of the dress by drawing a line across the pattern, perpendicular to the grainline, mid-way down the dress. I then cut along this line, added in 15cm (6 inches) and blended the lines to the sides of the dress. I also added 3cm to the length of the sleeve using the same method.
Pattern pieces 6 (bias sleeve placket / continuous lap) and 7 (belt) are not included on the pattern sheets. You will need to cut your own pieces using the measurements on page 15 of the instructions. I used the excess paper on the pattern sheet to draw out the pattern pieces.
Please note: I thought the dimensions provided for the belt were too narrow so I cut my belt 10cm (4 inches) wide. The dimensions of the sleeve placket provided are too wide so I cut my placket 4cm (1 ½ inches) wide.
The fabric doesn’t necessarily have a definite direction but I decided to ignore the cutting layout provided and lay out the pieces so everything went in the same direction. As the fabric is a little slippery, I traced the collar piece so it was one whole piece and cut this through a double layer, rather than as two pieces cut on the fold to ensure the shape of it was correct as the fabric is rather slippery and distorts easily.
I used a rotary cutter and mat to cut out the belt and sleeve plackets.
There is no pocket on the dress, but an in-seam pocket could be easily added.
Transferring pattern markings
Make sure to transfer all the notches, particularly on the sleeve and armholes. I used a tailor’s tack on the square marking for the sleeve slit and a small snip at the lower end of the sleeve slit.
The sleeve will be cut from the lower snip up to the square marking / tailor’s tack at a later stage. Don’t cut this yet and take a look at my notes below in the ‘applying the cuff’ section on how to staystitch the edge of the slit before you cut.
I didn’t transfer the pattern markings for the buttons until I had interfaced the cuffs.
Interfacing
I used a lightweight fusible interfacing for the collar and the cuffs.
I interfaced the whole of each cuff, rather than just half to add more stability.
Trim 3mm (1/8”) from the sides of the interfacing pieces so these are ever so slightly smaller than the fabric piece it will be applied to.
This fabric moves a lot so before applying the interfacing make sure that the fabric pieces are not distorted. Lay the paper pattern onto the ironing board and then place each fabric piece on the top, to make sure that the shapes match. Make any adjustments to the fabric position and then apply the interfacing.

Making up the garment
I used a size 80/12 universal needle to avoid snagging the fabric. You may wish to use a microtext needle. Test out the needle first on some scraps before sewing up your dress.
The seam allowance on the pattern is 1cm. I used a 6mm seam allowance on the bias sleeve placket / continuous lap (see notes below).
I edge finished all the seams with a 3-thread narrow overlocking (serging) stitch. This is my preferred method for overlocking woven fabrics which don’t easily fray. Simply remove and unthread the left needle of your overlocker (serger) to create a narrower stitch.
Inserting the zip
Take care to insert the concealed zip so that the seam line of the collar matches on either side of the zip. You can see my video on how to insert a concealed zip here
For more tips on how to insert a concealed zip to ensure the seam lines meet up, take a look at the sew along I’ve created for the Peony dress here, you’ll find the zip information at 19:46.
Both videos show the technique using a 1.5cm (5/8 inch) seam allowance. The Holly dress has a 1cm seam allowance so you’ll be lining up the edge of the zip with the overlocked edge of the centre back.
Attaching the collar
To attach the collar facing, place the collar facing piece on top of the outer collar. Have the centre back edges sticking out so you can match the centre back edges of the collar facing to the centre back edges of the collar.


When attaching the collar facing, I used a regular zip foot to stitch the centre back sections of the collar facing close to the zip. You can see the images below show the needle position as I stitch the centre back sections on either end of the collar.


After stitching the seams, I trimmed across the corners before turning them out to the right side

You might find it useful to see how to understitch on my ‘How to attach a facing’ video.
This is the image of the collar after understitching:

I hand tacked (basted) the collar facing in place before stitching in the ditch from the right side. I applied the ‘Made to Party’ sewing label at this stage, tacking this in place close to the centre back edge of the collar, before stitching in the ditch to secure the collar facing and the label.

Attaching the bias sleeve placket and cuff.
This pattern piece is termed ‘bias’ but is not cut on the bias or applied to the bias of the fabric. It is often referred to as a ‘continuous lap’ in other sewing patterns. This finishes the edge of the sleeve slit.
As this fabric is a little delicate and frays a lot, don’t just cut open the slit. Mark 6mm (1/4 inch) either side of the slit and then draw a line from these marks to the top of the slit (square marking on pattern piece).

Stitch along the line you’ve marked taking 1 stitch across the top of the slit.

Cut from the lower marking for the slit to the top, getting as close as you can to your stitch at the top of the slit.

I’ve created a video on ‘how to create a shirt cuff with a continuous lap’ which explains the process of stay stitching the slit and then how to apply the continuous lap (or bias sleeve placket as it is referred to on this pattern).
Take care with the how you fold and stitch the continuous lap in the final stage. The cuff will close in the direction of the back of the sleeve. The video shows how the continuous lap is folded and finished on the right hand sleeve. You will need to do the opposite on the left hand sleeve. See further below for the close up images of the finished cuffs.
The video shows pleating at the lower edge of the cuff but you will be gathering to dispose of the fullness in the sleeve instead.
The video also explains the process I use for applying the cuff which I find gives a better finish than the method in the instructions. I’ve chosen to hand slip stitch to finish the inside of the cuff on the Holly dress, rather than stitching on the machine. I also didn’t top stitch the cuff as shown in the video.
There are 3 buttons and buttonholes on each cuff. I’ve used 11mm self cover buttons. I cut around the small spotty baubles on the fabric so each of the buttons has the same part of the design on it.
These buttons are a little difficult to create since the fabric is slippery and the buttons are small. I used a short running stitch around each fabric circle to draw in the fullness of the fabric and cover the button.

I then secured the stitching to the button, trimmed off the excess fabric and then used the self cover button tool. The covered button goes into the grey part of the device and the back of the button goes on top. The black part of the device is used to squeeze and close the back and front of the button together.

The finished buttons.

You can read my tutorial here on ‘how to cover buttons with fabric’.
Or you can follow the video here on ‘How to cover buttons with fabric’
Take care to consider which side of the cuff the buttonholes will be sewn. I stitched the buttonholes first, using the markings on the pattern for the buttons. I then positioned the buttons to match.
The image below shows the finished left and right sleeve cuffs open

The image below shows the left and right hand cuffs closed.

Close up of the open right cuff.

Close up of the closed right cuff.

Inserting the sleeves
I added ease stitching around the sleeve head between the notches to help distribute the fullness in the top of the sleeve so these could be inserted more easily. Make sure that the notches match up, so you insert the sleeve into the correct armhole.
Belt
Follow the instructions to construct the belt, leaving the hole for turning in the centre.
Use a ruler to turn the belt out to the right side, pushing the ruler into the belt from either end. Use a point turner or similar tool to poke out the corners.


To help with pressing the belt, I pinned the belt to the ironing board to keep the edge of the seam in place.

Hem
I finished the dress with a double turned hem as shown in this ‘Turned twice and machine stitch hem’ video.
More tutorials and videos on techniques can be found at www.houseofmisssew.com.