Welcome to your March 2022 Dream Wardrobe.
UK SIZES 6-18
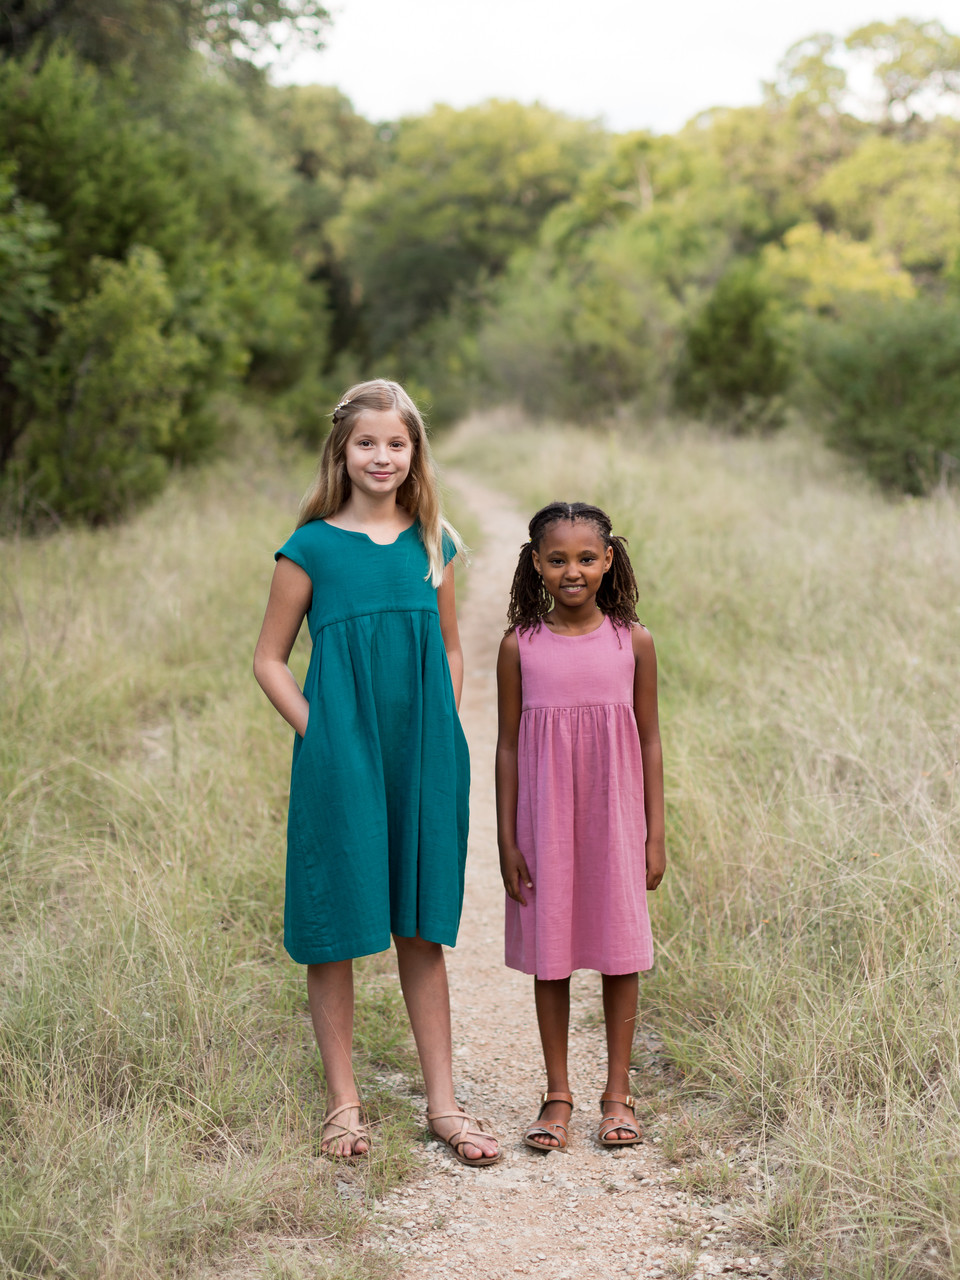
The sun is finally shining, and spring is well and truly in the air! I am a huge fan of spending my time making clothes that can be worn all year round. This month I have a treat for you. A beautiful soft double gauze and a floaty dress pattern. This dress will look amazing now with leggings, boots and a cardigan. Then, as the weather warms up you can pull it on with just a simple pair of sandals and be beach ready…
About the fabric:
This Double sided cotton double gauze acts as an excellent natural insulator as it is made of 2 layers of fine cotton gauze sewn together. This traps the air keeping you warm in cooler weather. It is also great for hot days with the lightweight cotton being breathable and light to wear.
I love the reversible print of this fabric meaning you can play around with what size gingham you want. You could even try mixing it up and having a bigger check on the skirt and the smaller on the bodice or vice versa.
You've got 3m of fabric, here are some other great pattern suggestions for double gauze:


I always recommend that you pre-wash your fabric. This is especially important with fabrics that are made from natural fibres (cotton, linen, viscose etc) as these have more of a tendency to shrink. Also, they are more likely to have a dressing added at the factory that can change the feel and handle of the fabric once washed.
Scrap Busting Projects:
One of our subscribers pointed out that there is often left-over fabric from her Dream Wardrobe. So I suggested that each month I include some scrap busting ideas for the fabric we send out. Double gauze is perfect for face cloths and makeup rounds.
Face cloths and make up rounds:
To make face cloths that I use to wash my face and body, I simply cut a piece of fabric approx. 25cm square and overlock all the edges. If you don't have an overlocker, you can use a zig zag stitch on your sewing machine or press and fold over the edges before sewing them with a straight stitch. I find these cloths way better than a traditional flannel, the texture gently exfoliates your skin and they dry really fast, no soggy flannels lying around the bathroom!
For the makeup remover rounds (I actually make them square with rounded corners) I cut squares of double gauze and bamboo towelling about 10cm square. If you have a rotary blade you can cut them together. Layer the squares on top of each other and overlock them together round the edge. By rounding off the corners it makes it easier to sew in one piece without having to pivot at the corners.
If you don't have an overlocker, try finishing the edges with a bias binding.
About the pattern:
The Merchant & Mills Florence Dress & Top has a wide floaty bodice with a fabulous, curved seam. A gently gathered skirt (or peplum in the top version) give this dress a romantic feel.
This pattern would work really well in so many different fabrics. For a different feel why not try one of the following:


Notions required:
All available form Fabric Godmother.
- Matching thread (we have sent you a reel of the Gutermann rPET thread made entirely from recycled plastic bottles)
- 3 x Buttons 15mm (we used these ones)
About your gift:
Add a more professional finish to your me made garments by adding a label. These Dream Wardrobe labels will help you build your own Dream Wardrobe.
#fgdreamwardrobe
Please use the hashtag #fgdreamwardrobe and share your unboxing and makes on social media.
Happy sewing, Josie xxx
Julia's Sewing Notes:
Ironing
This fabric irons beautifully and easily. It does naturally have crinkles in it so don’t iron it too much. I used almost the maximum heat setting on my iron and a little steam.
Cutting Out
This dress / top has plenty of ease so after comparing your body measurement to those on the pattern, look at the ‘Finished garment measurements’ to help you choose the right size. I chose a size smaller than the one which best fitted the body measurements.
I think all dresses should have pockets (I realise that my view isn’t shared by everyone) and I’d suggest cutting out some in seam pockets to add around the hip line of the dress. You can create your own pattern or take one from another pattern, I’m sure there’s one in your stash – just make sure it fits your hand.
If you’re using the double-sided gingham fabric for your project you can choose to use either side of the fabric, or to make the top from one size of gingham and the skirt from the other size. I made mine all from the smaller size checks.
Transferring pattern markings
Make sure to transfer all the notches – I use a tiny snip in the centre of the notch marking. Make sure to mark the centre back notch and notches of the fold lines on the back pattern piece. There’s also a tiny dart on the shoulder to transfer to your fabric.
I applied interfacing to the back bodice before I transferred the markings for the buttons.
Interfacing
I applied more interfacing than the pattern suggested.
The double gauze fabric is very lightweight so I chose to interface the back section for 9.5cm to cover the entire button stand section. This will provide more stability for the button holes and the buttons.
Making up the garment
I used a size 80/12 universal needle as the fabric is lightweight. Make sure to use a fresh (ish) needle as this fabric will easily be snagged by a blunt needle.
The seam allowance on the pattern is 1.5cm except for when applying the binding when a 1cm seam allowance is used.
I edge finished all the seams with a 3-thread narrow overlocking (serging) stitch. This is my preferred method for overlocking woven fabrics which don’t easily fray. Simply remove and unthread the left needle of your overlocker (serger) to create a narrower stitch.
The first instructions suggest to apply seam tape or a strip of fine selvedge to the lower edge of the front. This is to stabilise the seam since the skirt part is heavier than the top. I used thin strips of interfacing, approximately 1.6cm wide. I fused the strips in place and then stay stitched them 1.3cm from the raw edge. You can see these strips in the video I made at 10:14. The link for the video is below.
You may wish to use a shop bought, pre-folded bias binding to use around the neckline, particularly as the double gauze is a little awkward and the layers start to separate. If you choose this option you’ll need 15mm (5/8”) - 20mm (1 ¾”) single fold bias tape.
The process of applying the bias binding is straightforward but the image in step 6 is quite confusing. I’ve made a video to explain these steps and also how I understitched the binding before top stitching. The link can be found on my YouTube Channel here:
https://youtu.be/4dJGIHYhIaM
At step 8, the buttonholes are sewn. I chose to make mine vertical and stitched these in the centre of the button stand, rather than along the centre back line (where they would usually be sewn).
The left back is wrapped over the right back and the centre back notches should align. However, this dress has plenty of ease so I had enough room to overlap the back opening slightly further than the designated notches for the centre back. I prefer how this looks so the interfaced button stands fully overlap each other.
I used 21.5mm (1 7/8”) Grey Pearl Shell Buttons which are an excellent match to this fabric.
When it comes to sewing on the buttons on the back of the dress / top, take care with the placement of these once the buttonholes are sewn and cut. The buttons should be placed 3mm from the top of each buttonhole. I’ve made a video explaining this process, including how to correctly sew on buttons to include a ‘thread shank.’
https://www.youtube.com/watch?v=ziZ_IbosETs&t=1s
I used a 2.5cm hem on the sleeve and the lower edge of the skirt, turning the fabric twice to enclose the raw edge.
More tutorials and videos on techniques can be found at www.houseofmisssew.com or https://www.youtube.com/c/HouseofMissSew/videos