


Description
** THIS IS A PDF PATTERN. YOU WILL RECEIVE A LINK TO DOWNLOAD THE DIGITAL FILES IN YOUR CONFIRMATION EMAIL AFTER PURCHASE**
Did you know we can print out this pattern on A0 paper and post it to you?
- If you would like us to print out this pattern for you, add this pattern to your cart, then click here.
- It will then ask you how many pages your pattern has. This pattern has 3 PAGES.
- You do not need to upload the pattern file.
For more information about PDF pattern printing check out our PDF Guide.
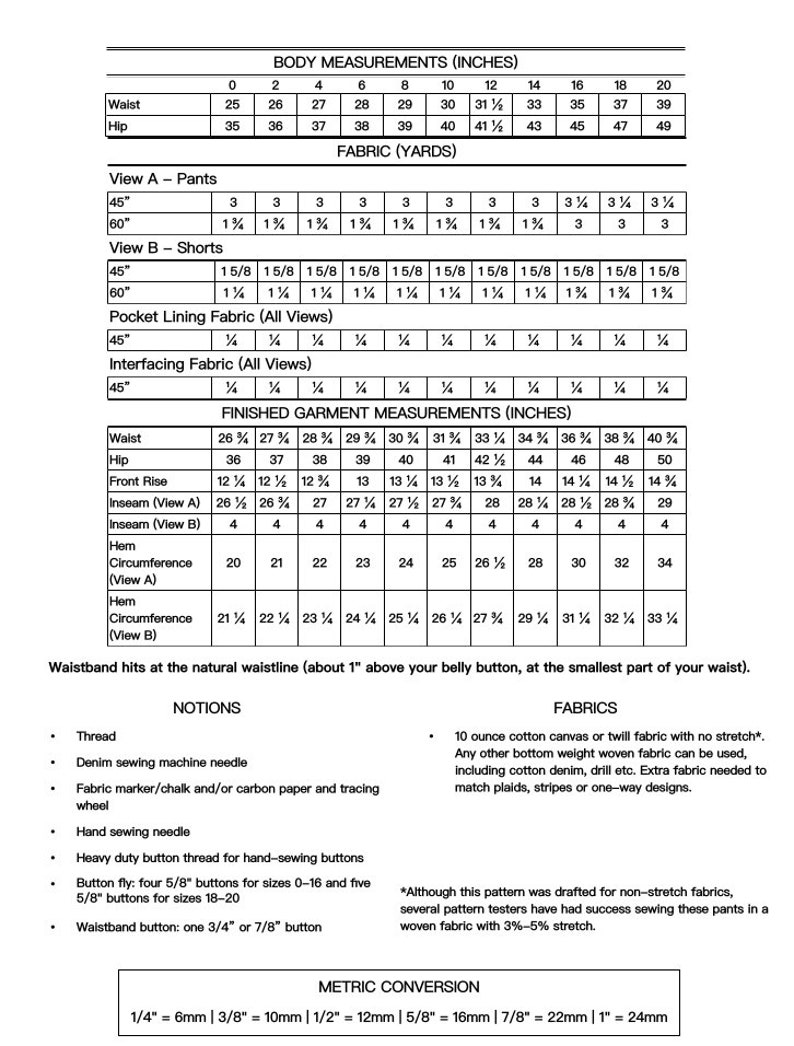
The Persephone Pants + Shorts pattern is based on photographs of men’s 1920s-’40s US Navy sailor pants. This is a high waist pants and shorts PDF sewing pattern. These pants are unique in that they do not contain side seams. The front and back pant legs are cut from one piece. It has a concealed button fly, front waist in-seam pockets, belt loops, and two back waist shaping darts. View A: Cropped length pants + View B: Cut-off shorts. Intended to be made with woven non-stretch fabrics, however 3%-5% stretch woven fabrics can also be used. Please refer to the Measurement Chart for information on the fabric/notions you will need for this project.
SEWING LEVEL: This pattern is appropriate for Intermediate sewers.
cotton canvas, bottom weight, twill, denim, duck, non stretch
SIZES: 0-20
The chart below can also be viewed in the images of this listing where it can be enlarged
PATTERN INCLUDES:
- Sewing instructions with clear illustrations for each step
- Print-at-home pattern
- Copy shop pattern including both US and A0 page sizes
PRINTING YOUR PDF PATTERN
After downloading the files to your computer, you can print out the pattern using your home printer. The pattern pages are formatted to fit US standard page size (8.5” x 11”) as well as A4 page size (8.26” x 11.69”). Be sure the printer settings are set to “actual size” and only print the first page that includes the test square before printing the rest of the pattern. Measure the test square with a ruler to be sure the pattern pages will print accurately. If the measurements are correct, go ahead and print the entire pattern. Assemble the printed pattern by cutting out the pattern pieces and matching them together by the letters and numbers that are marked on each pattern (“1A” to “1A”, “1B” to “1B” etc.) and then taping them together.


